
1. Start QuikFynd Service on Your NAS device
This articles assumes that you have already downloaded QuikFynd server on your NAS and started it.You can access the QuikFynd server on your NAS by clicking the Web link. QuikFynd server will automatically register itself with QuikFynd cloud service. A waiting indicator is shown while the QuikFynd server starts and completes initialization.
NOTE: QuikFynd server can take up to a minute to start. This a normal behavior and you will see the next page shortly.

2. Sign In to Your QuikFynd Account

. .

Before you can start accessing your files, you have to log in your existing QuikFynd account by clicking SIGN IN. If you don't have an account, you can create a new one by providing your email address and a password. Just click I'M NEW. You only need to create your QuikFynd account once and then you can link multiple devices. Same account is also used for you to access your content from your mobile devices.
After you Sign In, QuikFynd will verify if your QuikFynd account is authorized to access content on your NAS device. his is a security feature to make sure that only verified users can access files on your NAS device.
If you using this NAS device for the first time, your QuikFynd account is not authorized to access content on your NAS and you will need to provide your NAS user credentials in next step.
3. Review Settings


After QuikFynd verifies your NAS userid/password, it is ready to start indexing your content so that you can begin to find your files easily. You can control what kind of files are indexed, how often and what folders to include for indexing. QuikFynd has reasonable defaults for these settings.
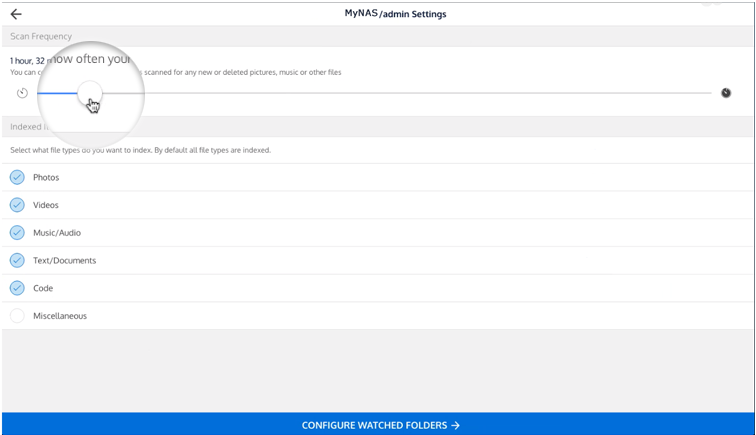
Scan Frequency enables you to control how often QuikFynd scans your device for any new or deleted files. Default value is 30 minutes but you can adjust from anywhere between 10 minutes and 24 hours.
TIP: If you have a lot of content, setting a higher value for scan frequency is recommended so as not to put extra CPU load on your NAS for doing indexing
Indexed Items allow you to select type of items you want indexed. You can exclude certain file types e.g. Code or Pictures.
Watched Folders enable you to control what folders are included in your search index.
TIP: You can navigate the folder hierarchy by clicking anywhere on the folder row. Select a folder to be indexed by clicking on the Radio button next to it.
4. Start Searching
After you have reviewed your settings, QuikFynd will start the indexing process. Depending on count and type of files you have, it may take several hours for indexing process to complete. QuikFynd does indexing in two phases. First is a quicker scan of your file system to identify types of files and meta data in files. Second phase is deeper inspection for Full text search. You will see count of various file types on your NAS on the dashboard page. From here you can access your files and perform searches.
TIP: Search can be performed the moment QuikFynd starts indexing but initially only items matching your search term in file name or file metadata may appear. After QuikFynd has had a chance to do a deeper inspection of files, search results will contain files with matching keywords in content.